
By Philippe 'Elwood' Ferrucci
Edited by Darren 'Ryu' Glenn
Original pictures were by Chris Morris
Greetings to the Frieden Bros. for putting my name into U-boot ;-)
Some history
There are several versions of U-Boot, but if you are running a version prior to U-Boot 1.0.0 then you will not be able to run OS4.
This article is about U-boot 1.1.1 available on the last OS4 update. You'll have to install it from there. This process is not as easy as installing software, so if you don't feel you'll be able to do it, please contact a friend, your user group or your dealer.
1 - Overview:
U-boot is not a BIOS (or firmware) as found on a PC, it would be better described as a monitor. It is based from the open source project called U-boot (http://sourceforge.net/projects/u-boot). It has been greatly improved by the Frieden brothers and Andrea Vallinotto and probably other people from the OS4 team.
Even if it's not the best solution for the next generation Amiga hardware, it still allows you to do a lot of things. Of course, enhancing U-boot is not a priority as the OS4 team has other more important things to do; when the time comes U-boot will be updated or even replaced by a better solution. Until then it's more than capable for your every-days needs.
U-boot's job is to initialize the hardware and to start the booting process of the system you want (AmigaOS or Linux). Of course, you'll be able to define some settings that you may want to use either for the next boot or for everytime you use your AmigaOne.
There are two ways to use U-boot, a console mode and a graphical one. If you are not an expert don't panic, once you have setup some U-boot variables, you'll use the console very rarely. You will only use the graphic part, the U-boot menus, which is much easier to use.
Your AmigaOne can boot in many different ways, depending how you setup your U-boot variables. But this article describes how your AmigaOne should boot to be easier to use (it's an Amiga after all :-). You'll find below a brief description of each different part of a standard boot process so that you'll be able to recognize each of them. And you'll learn how to move from one part to another and how to define the settings to customize your A1 boot process.
In order to explain how the AmigaOne boots, it is needed to understand how to manage U-boot variables. To learn how to deal with variables, please read the environment variables section below.
2 - Different stages during an AmigaOne boot:
2.1 - Hardware initialisation phase
When you start your A1 the basic x86 emulator integrated into U-boot will execute the ROM of your graphics card. The display will then be switched on and the first information will appear. The hardware is then checked and initialized. U-boot will display what kind of hardware you have: a SCSI card (if available), the network card, the IDE bus contents (hard disks, CD drives...) etc.
2.2 - The Uboot console
At this point, if you have the "bootdelay" variable set, U-boot will display the text "Press any key to interrupt autoboot" and at the end of the line a countdown will run. 
Press the Enter key to stop this countdown. You will be on front of a black screen, with no window borders. A prompt is set to ']' and the cursor blinks waiting for you to enter text commands.
The U-boot console lets you execute directly a lot of commands. It's a bit like in an Amiga shell but a very basic one. You'll be able to display information about your hardware, set environment variables, boot an operating system etc.
The behaviour of U-boot depends on the settings that were applied by you, or your dealer you purchased your AmigaOne from. But we strongly suggest that you define the following environment variables so that you'll be able to boot either AmigaOS or Linux in the easier way (using the U-boot menus). This article will take this behaviour as a starting point.
Enter the following commands at the U-boot prompt (of course, no keyboard layout has been defined at this point so you need to type the following text on a Qwerty keyboard layout):
] setenv preboot
] setenv bootdelay
] setenv menuboot_delay 5
] setenv bootcmd "menu; run menuboot_cmd"
] saveenv
2.3 - U-boot boot selection menu
When you boot your AmigaOne now, U-boot will show you a semi-graphical progress bar like this: 
During this countdown, if you press "Enter", you will go to the boot selection menu. Pressing any key except "Enter" will bring you to the preferences menu.
This boot selection menu allows you to define which boot disk will be scanned for a system to boot and you'll be able here to make some changing depending on what and how you want to boot.
Of course, if you don't stop the countdown, the operating system set as the default will be booted. This setting is defined in the boot sequence menu.
2.4 - Preferences menu
If you pressed a key (different to "Enter") on the keyboard during the graphical countdown, you will go to the preferences menu. Here you will be able to set all the settings that will be stored, and then remembered from one boot to another. In this respect it is different from the boot selection menu where you could change some settings but not store them. They were used just once, because "this time" you wanted to change some boot settings, compared to your default settings.
2.5 - Console/Graphical boot sequence
As a picture is better than words, here are the different steps that are executed. You see below each variable that are involved in changing the boot behaviour:
- bootdelay: number of seconds the text countdown will last
- bootcmd: this variable will launch the menu and boot when you quit it
- menuboot_delay: number of seconds the graphical countdown will last
Also in this picture, you can see the different keys you can type during this boot process, and the actions they will do. 
The U-boot console:
Console overview:
The console is mainly used to run commands and have a direct result from their execution or to set environment variables. These variables are settings you can modify in order to make U-boot suits your needs. Some commands are easy to understand and to use and some of them will be described here. But there are low level commands too, like the ones to modify memory or erase the flash memory. These should be used only by experts.
All commands are briefly described at the end of this article.
First of all, to display a list of all available commands, type "help" at the prompt:
] help You can get more help text for a specific command by typing "help" followed by the command name like this:
] help help All commands can be abbreviated with less characters, as long as you provide enough of them to distinguish between two commands.
Also note that you can stop a command output using the Ctrl-C key sequence.
Environment variables:
One of the most useful command is "setenv". It allows you to define or erase an environment variable. The syntax is:
] setenv <name> <text>You can use such variables to define some settings and you can even run them.
As an example, it's possible to create an alias for the help command with "setenv h help". You can then run it with "run h".
If you want to erase a variable, use the command with no text argument like:
] setenv <name> The variables you set are valid only in the current U-boot session. So they will be lost if you exit U-boot, either by shutting down your A1 or booting an operating system. If you want to save the variables so that they survive a reset, use the "saveenv" command. Doing so, the variables will be stored into the flash memory (non-volatile RAM).
To display all (or one) currently existing variables, use the "printenv" command like:
] printenv
] printenv bootcmd
If there are spaces in the commands you want to link to an env variable name, use double-quotes like:
] setenv lnx "diskboot 500000 1:1" Of course, you can enter multiple commands separated by a ";" character. The following line will list your IDE peripherals and the help text of the ide command:
] ide info;help ide As already said, after the hardware is initialized at boot time, a countdown is ran. If you don't want it, clear the "bootdelay" variable with:
] setenv bootdelay Do the same with the graphical countdown. If you don't want it, clear the "menuboot_delay" variable.
After the execution of this countdown the content of the "bootcmd" variable will be executed. So the menu will be open, and after that, the content of the "menuboot_cmd" variable (set by the menu) will be executed.
If you use an Amiga keyboard with a Catweasel card, you'll have to set the "stdin" variable:
] setenv stdin amiga If you use a PC keyboard, "stdin" is set to "ps2kbd".
By default, the default output device is the screen (the "stdout" variable is set to "vga"). If you want to redirect the output of some commands to the serial line, set it like this:
] setenv stdout serial If you monitor the output on the serial line of your A1, you may need to set the speed rate of the output like: ] setenv baudrate 115200
If you look at all environment variables, you'll notice some of them correspond to settings you can find in the U-boot menus. This is how it works. The preferences menu just set variables and upon exit of the menu, U-boot executes the variable contents.
Console commands:
In U-boot, you can use several commands that deal with the hardware (IDE, USB, memory...). You can execute commands to run the supported operating systems and as already explained, you can alter the settings using the "setenv" command.
In order to get an explanation about how to run a command, do not hesitate to use the "help" command on it. Doing so, you'll discover that some commands have arguments. As an example, type:
] help ide U-boot will display each arguments that can be used with the "ide" command. You can display what IDE disks have been detected by U-boot using:
] ide info This is the same output as the one you can see immediately after you started your A1. If you inserted a CD/DVD in a drive and you want U-boot to detect it, type:
] ide reset The same way, you can display the detected USB devices using:
] usb tree When you bought your A1, it's possible that your system date was not set. In order to store the current date into the saved clock, use the "date" command like this:
] date MMDDhhmmCCYYwill set the date to day "DD" of month "MM" in year "CCYY" with a time of "hh" hours and "mm" minutes.
Example: date 100612252004 to set the date to 06th Oct 2004 at 12:25
If you just want to enter the menu and, when you quit it you want to go back to the console, just enter "menu" at the prompt.
But if you want to run the menu and then boot the desired operating system, use the "boot" command. This will have the same effect as if you just started your A1 i.e. to run the default boot process.
When you're at the prompt, if you want to start an OS using the Amiga multiboot method (more on this later) i.e. using the SLB stored on a disk, select "boota" at the prompt.
If you want to run Linux type "diskboot" and if you want to boot from a floppy disk (like when updating your U-boot firmware), use "fdcboot".
Note that these two methods will load an U-boot image from the disk/floppy. After being loaded, if the image is not automatically started, you don't have the "autostart" variable set. Just set it to "yes" and a diskboot/fdcboot will load and execute the image.
If you want to reset your A1, you can type the "reset" command. It will have the same effect as rebooting with the case reset button.
The U-boot menus:
The menu system is much easier to use than the console mode. It allows you to define settings, display information about your system, which disk you want to boot from, etc.
Just use the arrow keys to move to the value you want to edit (or select) and press "Enter" to change (or select) it. In case of a changeable setting, you'll then be able to select a different value in a drop down menu, or to enter some text to modify a text based setting.
Everywhere in the menus, the "Enter" key is to select/modify and the "Esc" key is used to quit/cancel.
There are two main menus:
The boot selection menu is used only to change the boot disk and the arguments you want to boot AmigaOS or Linux with.
The preferences menu will allow you to show or modify all settings available in U-boot.
The boot selection menu:
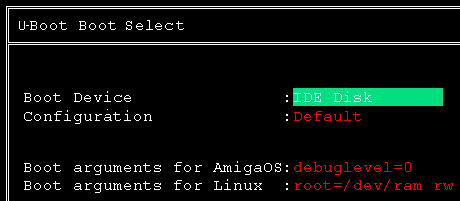
In U-boot you define which settings to use everytime you boot the AmigaOne. But if you need to change some of them i.e boot disk, OS4 boot configuration, Linux kernel settings etc, you can use this boot selector menu to change them only for the current boot.
These settings will be temporary, they won't be saved into the flash memory.
If you want to boot on a disk which is different to your default boot device, select a different disk from the "Boot device" dropdown list.
If you want to select a different kicklayout configuration to boot AmigaOS with, modify the "Configuration" field with the configuration you want to load.
If you leave this field empty, you'll be asked which configuration you want to load.
Change the "Boot arguments for AmigaOS" field if you want to modify the arguments you want to pass to the AmigaOS kernel: debug level, some settings to control its behaviour.
And if you boot Linux with the direct method (using "diskboot"), you can change here the "Boot arguments for Linux".
When you've made your choices, press the ESC key and select "Boot this configuration". Your system will then boot using the displayed settings.
If you changed the settings but finally decide not to use these changes, select "Continue normal boot". The settings displayed on the screen will be ignored and the default settings will be used instead.
In the ESC menu, select "Go to preferences menu" to go to the second menu. There you'll be able to define the default settings for your AmigaOne.
The preferences menu:
There are several sub-menus here. Some of them are used to display information about your system, like the "System information" which will show you several details about your CPU, memory etc.
In the "Integrated peripherals" menu you can change settings of the serial, parallel, USB and IDE internal ports.
The only setting you'll probably change is the "PAR port mode". You have to set it to "EPP".
The "Memory" menu allows you to limit the amount of memory your A1 will use. This is useful on some Linux systems if you have a lot of memory (> 900 MB).
You can tweak interrupts settings of the PCI/AGP ports of your A1 in the "PCI/AGP" menu.
The "Default/Fix settings" menu may be useful for restoring U-boot default values.
The "Diagnostics" menu item will perform tests of different parts of your A1 hardware. This is not recommended for beginners. When you press the ESC key in the preferences menu, you'll be able to select what to do:
"Save settings and exit" will store all current settings into the flash memory and then quit the U-boot menu system. This will continue a normal boot process if you defined the environment variables as described before.
If you select "Use settings for this session only", no settings will be stored but they will be used to boot the system.
Choosing "Leave without saving" will boot the OS with the default settings. So whatever you changed in the U-boot menu won't be taken into account.
The last choice "Abort U-boot and enter U-boot shell", will lead you to the text console.
Boot sequence menu:

Here you can define what system your AmigaOne will boot - AmigaOS or Linux - and which settings should be used to boot this system.
Also you can set some settings if you want to boot from a TFTP server on your network.
There are two main boot methods. The first one called "Amiga multiboot" is the Amiga boot method. It uses the SLB to scan the disks for bootable systems. This is the prefered boot method.
The second boot method is called "Linux boot". If you choose this one, your computer will load Linux from a kernel image you have previously dumped on a partition of your disk.
"Boot arguments for AmigaOS" is the kernel command line which is passed to the system on startup. Here, you can set parameters which will allow you to boot AmigaOS with a slightly different behaviour of the kernel.
One of them is "debuglevel=x". It allows to set how many debug output the debug OS4 kernel will send to the serial line.
Changing these arguments is only useful for testing/debugging purposes.
"Boot arguments for Linux" are the kernel settings you will use if you start a Linux system through the "Linux boot" method.
Amiga multiboot options:
In this menu, you can set three different boot devices. They will be scanned (to find bootable systems) from top to bottom when you boot your A1, i.e. boot device 1 is tested first, then 2, then 3.
In the "configuration" item, you enter the default configuration to boot. After the timeout delay (set right below), this AmigaOS configuration will be booted. If you leave this empty, you will be asked which configuration to load.
Linux boot options:
In this menu, you'll define which partition on which disk, you have dumped a kernel image to. In "boot device", you have to enter the disk number and the partition number separated by a ":" character.
The disk installed as Primary Master is numbered 0.
The disk installed as Primary Slave is numbered 1.
The disk installed as Secondary Master is numbered 2.
The disk installed as Secondary Slave is numbered 3.
You can define which kind of boot you want to use: from a disk or from the network.
Booting an operating system:
There are two ways to boot a system: loading a U-boot image using the appropriate command ("diskboot", "fdcboot"...) or using the AmigaOS method: through the "boota" command.
Linux boot / diskboot method:
The "U-boot image" method works like this: a U-boot command loads a U-boot image from a disk. This image can be stored either on a floppy disk, on a CDROM or on a partition of the hard disk. The command to execute will depend on where this image is to be loaded from. The "fdcboot" command will load it from an inserted floppy disk, and "diskboot" will load it from a CDROM/hard disk.
The U-boot image is loaded into memory and executed from there. If the "autostart" variable is set to "yes", the image will be executed automatically after it has been loaded. Without this variable set, you need to issue the "bootm" command.
Note that you already used this method to update U-boot. Here are the possible scenarios where this "load and run" method is used:
- when you run a U-boot updater floppy or CDROM,
- when you boot a Linux install CD (the kernel is stored on the CD)
- when you boot Linux loading a kernel written on a partition of your hard disk
As an example: if you want to boot a U-boot updater CD, you'll have to use the console to type the command "diskboot 500000 1:0" (if you installed your CDROM drive as Primary Slave).
Amiga multiboot / boota method:
The Amiga boot method is called multiboot because you can boot either AmigaOS or various Linux systems with it. It is much more flexible than the Linux boot because this one was tied to a specific partition. The one where the Linux image is stored.
The Amiga boot method is based on the use of the FLB (First Level Booter) in U-boot and the SLB (Second Level Booter) stored on a disk. When you boot your A1, the SLB is executed. It will find all possible bootable systems/configurations (Amiga and Linux). To do this, it will scan the selected boot device (often your main harddisk) on which it will check all partitions you have set as "bootable" in "Media Toolbox". On these bootable partitions it will find all defined AmigaOS configurations (in the Kicklayout file) and all defined Linux configurations.
All you have to do is to select the disk where you want to boot a system.
If you want to boot the OS4 CD, just select "IDE CDRom" from the boot selection menu. If you want to load your OS4 from hard disk, select "IDE Disk" as a boot device. Remember that this boot method requires that you installed the Second Level Booter (SLB) on your disk (be it a hard disk, a CDROM, a Compact Flash...). For more details about it, read the documentation about the installation process (available on your AmigaOS CD).
The SLB will scan your disk to find all AmigaOS configurations to boot and all Linux configurations.
The AmigaOS configurations are read from the Kicklayout file found on the bootable partition of your AmigaOS system disk. To learn how to use different kernel modules configurations read this article.
You can define several Linux configurations using a similar scheme. The SLB will scan all Linux partitions you had define as "bootable" using "Media Toolbox". In these partitions, it will load the text file /boot/a1boot.conf. Write in this file all the configurations you want to define, one on each line, using the following template:
<Configuration name> <kernel filename> <kernel line> Example:
Debian2.4.26 /boot/kernel2.4.26 root=/dev/hda...... Debugging:
With the debug version of the OS4 kernel you can send detailed debug text to the serial port. Use a null modem cable to connect another computer to your AmigaOne serial port. Run a terminal program on the other computer so that you can catch the output. You have to set your terminal program to use 8 bits, no parity, 1 stop bit. The transfer speed must match the one you set in U-boot in the "baudrate" environment variable. Doing this will allow you to understand why a program crashes, and you will be able to help the coders by sending very detailed information about the experienced crash.
U-boot can also output text to the serial port. As an example when booting your A1, a text like the following is sent through the serial line:
U-Boot 1.1.1 (Oct 4 2004 - 16:42:03), Build: 10/04/04

CPU: MPC7455 v2.1 @ 933.333 MHz
Board: AmigaOne
DRAM: 256 MB
FLASH: 0 kB
VGA: OK ..
In: serial
Out: serial
Err: serial
In fact, you can send any text to the serial port that is normally displayed in the console. You can do so like this:
] setenv stdout serial
] ide info
] setenv stdout vga
The future of U-boot:
As I said, when the OS4 team have time, they will enhance U-boot. But most Amigans are more interested in AmigaOS 4 and this is where they want to see changes. U-boot, even without being very friendly, is really enough like it is now.
Changing its code is not easy because the Open Source project is managed by people that don't seem to be very serious. The OS4 team has probably contributed more code than any other. Maybe writing a proprietary solution would be better. Time will tell...
U-boot command list:
The following help text is printed on screen when you type ] help <command>
askenv name [message] [size]
- get environment variable 'name' from stdin (max 'size' chars)
askenv name
- get environment variable 'name' from stdin
askenv name size
- get environment variable 'name' from stdin (max 'size' chars)
askenv name [message] size
- display 'message' string and get environment variable 'name'from stdin
  (max 'size' chars)

autoscr [addr]
- run script starting at addr. A valid autoscr header must be present
base
- print address offset for memory commands
base off
- set address offset for memory commands to 'off'
bdinfo
- print Board Info structure. No more help available.
boota
- 'Boota' is a great command, that enables you to do things that were only
	dreamt of before. Namely, booting AmigaOS4 on the A1. Aside from that, it
	takes no arguments, so any extended help is of no help.
bootd
- boot default, i.e., run 'bootcmd'. No more help available.
bootelf [address]
- load address of ELF image.
bootm [addr [arg ...]]
- boot application image stored in memory
	passing arguments 'arg ...'; when booting a Linux kernel,
	'arg' can be the address of an initrd image
bootp [loadAddress] [bootfilename]
- boot image via network using BootP/TFTP protocol.
bootvx [address]
- load address of vxWorks ELF image.
cmp [.b, .w, .l] addr1 addr2 count
- compare memory
coninfo
- print console devices and informations
cp [.b, .w, .l] source target count
- copy memory
crc32 address count [addr]
- compute CRC32 checksum [save at addr]
date [MMDDhhmm[[CC]YY][.ss]]
date reset
- without arguments: print date & time
- with numeric argument: set the system date & time
- with 'reset' argument: reset the RTC
dcache [on, off]
- enable or disable data (writethrough) cache
dhcp
- invoke DHCP client to obtain IP/boot params
diskboot loadAddr dev:part
- boot from IDE device 'dev' partition 'part' loading at address 'loadaddr'
echo [args..]
- echo args to console; \c suppresses newline
erase start end
- erase FLASH from addr 'start' to addr 'end'
erase N:SF[-SL]
- erase sectors SF-SL in FLASH bank # N
erase bank N
- erase FLASH bank # N
erase all
- erase all FLASH banks
fdcboot loadAddr drive
- boot from floppy device
fdosboot
- boot from a dos floppy file
fdosls
- list files in a directory
flinfo
- print information for all FLASH memory banks
flinfo N
- print information for FLASH memory bank # N
go addr [arg ...]
- start application at address 'addr' passing 'arg' as arguments
help [command ...]
- show help information (for 'command')
	'help' prints online help for the monitor commands.
	Without arguments, it prints a short usage message for all commands.
	To get detailed help for specific commands you can type
	'help' with one or more command names as arguments.
icache [on, off]
- enable or disable instruction cache
ide reset
- reset IDE controller
ide info
- show available IDE devices
ide device [dev]
- show or set current device
ide part [dev]
- print partition table of one or all IDE devices
ide read addr blk# cnt
ide write addr blk# cnt
- read/write `cnt' blocks starting at block `blk#'
	to/from memory address `addr'
iminfo addr [addr ...]
- print header information for application image starting at
	address 'addr' in memory; this includes verification of the
	image contents (magic number, header and payload checksums)
loadb [ off ] [ baud ]
- load binary file over serial port with offset 'off' and baudrate 'baud'
loads [ off ]
- load S-Record file over serial line with offset 'off'
loop [.b, .w, .l] address number_of_objects
- loop on a set of addresses
md [.b, .w, .l] address [# of objects]
- memory display
menu
- Show preferences menu
mm [.b, .w, .l] address
- memory modify, auto increment address
mtest [start [end [pattern]]]
- simple RAM read/write test
mw [.b, .w, .l] address value [count]
- write memory
nm [.b, .w, .l] address
- memory modify, read and keep address
pci [bus] [long]
- short or long list of PCI devices on bus 'bus'
pci header b.d.f
- show header of PCI device 'bus.device.function'
pci display[.b, .w, .l] b.d.f [address] [# of objects]
- display PCI configuration space (CFG)
pci next[.b, .w, .l] b.d.f address
- modify, read and keep CFG address
pci modify[.b, .w, .l] b.d.f address
- modify, auto increment CFG address
pci write[.b, .w, .l] b.d.f address value
- write to CFG address
post [diagnostic]
- do post diagnostic test, all of them or the one specified
- memtest/mousetest/kbdirqtest/rtctest/pcitest/idetest/usbtest
- ethernettest/lpttest/serialtest/alltest
printenv
- print values of all environment variables
printenv name ...
- print value of environment variable 'name'
protect on start end
- protect FLASH from addr 'start' to addr 'end'
protect on N:SF[-SL]
- protect sectors SF-SL in FLASH bank # N
protect on bank N
- protect FLASH bank # N
protect on all
- protect all FLASH banks
protect off start end
- make FLASH from addr 'start' to addr 'end' writable
protect off N:SF[-SL]
- make sectors SF-SL writable in FLASH bank # N
protect off bank N
- make FLASH bank # N writable
protect off all
- make all FLASH banks writable
rarpboot [loadAddress] [bootfilename]
- boot image via network using RARP/TFTP protocol
reset
- Performs RESET of the CPU. No more help available.
run var [...]
- run the commands in the environment variable(s) 'var'
saveenv
- save environment variables to persistent storage. No more help available.
scsiboot loadAddr dev:part
- boot from SCSI device
scsi reset
- reset SCSI controller
scsi info
- show available SCSI devices
scsi scan
- (re-)scan SCSI bus
scsi device [dev]
- show or set current device
scsi part [dev]
- print partition table of one or all SCSI devices
scsi read addr blk# cnt
- read `cnt' blocks starting at block `blk#'
	to memory address `addr'
setenv name value ...
- set environment variable 'name' to 'value ...'
setenv name
- delete environment variable 'name'
sleep N
- delay execution for N seconds (N is _decimal_ !!!)
tftpboot [loadAddress] [bootfilename]
- boot image via network using TFTP protocol
usb reset
- reset (rescan) USB controller
usb stop [f]
- stop USB [f]=force stop
usb tree
- show USB device tree
usb info [dev]
- show available USB devices
usb scan
- (re-)scan USB bus for storage devices
usb device [dev]
- show or set current USB storage device
usb part [dev]
- print partition table of one or all USB storage devices
usb read addr blk# cnt
- read `cnt' blocks starting at block `blk#' to memory address `addr'
usbboot loadAddr dev:part
- boot from USB device
version
- print monitor version. No more help available.
vesa
- run a vesa bios call
Compiled 09/11/2004