
How to Make a Boot CD for OS4
- Why Make a Boot CD?I find that a boot CD makes a good emergency recovery tool. It is handy to have when the installation script of some OS3.x program, or my experimentation, corrupts OS4. It is configured to provide easy access to the tools used to rebuild the OS4 libraries, datatypes, MUI, and etc. This can be particularly important since the systems many of us run were not installed from a singe CD, but incrementally upgraded from OS4 pre-releases.
Carefully consider your reason(s) when planning the layout.
- Required Hardware and Software
- Hardware ... ... ...
- CD burner on the Amiga
- or- - CD burner on another computer, and a way to move a 70MB image file (I used a USB-disk).
- Software ... ... ...
- OS4 system files, arranged in the directory structure for an OS4 boot disk. The CD does doesn't have to be created directly from a boot partition, it only needs a directory containing the proper files and directory structure. I work from a copy of my boot partition which is kept on another drive, but more about that later.
- Second Level Boot file, like slb_v2, slb_v2_nosfs, etc.
- CD burning software (obviously). These instructions were written using the version of MakeCD from an OS4 install CD, in the Contrib directory. MakeCD is also available from http://makecd.core.de/. The unregistered version will work, but the CD volume name will always be "unregistered". (Editors note: seem you need makecdromfs.module v45.12 (01.02.2004) to make a bootable CD, available from MakeCD's website)
- More burning software on another computer is needed if you don't have a burner attached to your Amiga. (These instructions are for such a case.)
These are the things that should be done before making a boot CD.
I strongly recommend that you think carefully about how the boot CD will be used. Will it operate "stand-alone" with all necessary software on the CD, or will it just boot a system, and then use software and data other drives.
I also recommend copying the boot partition into a directory, if at all possible. If that is not possible, make back-up copies of startup scripts and configuration files, because they will have to be changed.
- Step 1: Modify Startup Files:
- The CD will probably have a different volume name than the HD boot partition.
Look through the following list; modify files and settings as Appropriate:
- Startup-Sequence: Comment out the network startup with a semi-colon
";". It interrupts the boot process by causing an error which requires user intervention when it tries to write connection log information to the CD.
;C:AddNetInterface >NIL: DEVS:NetInterfaces/~(#?.(info|off))
Network interfaces can be launched manually once the system has started.
- User-Startup: Check ASSIGNs to make sure they point to the CD, and not the hard disk
boot partition.
- Check window and WorkBench backdrop image paths to insure that they will be valid.
- Check left-out icons.
- AmiDock: Autosave Prefs = OFF
Otherwise error messages will pop-up each time AmiDock is used (it will be trying to update its prefs on the CD).
- AmiDock: Remove dockies that point to files which might not be
available when the boot CD is used (more error messages avoided).
- Check the WBStartup directory for tasks that don't need to run. A CD is not as fast as a hard disk, so the startup process is longer.
- Step 2: Make CD Instructions:
- Run MakeCD (Yes, It's obvious, but I have to start somewhere.) Make sure you have set MakeCD to expert mode so you have all the options you need to follow this tutorial.
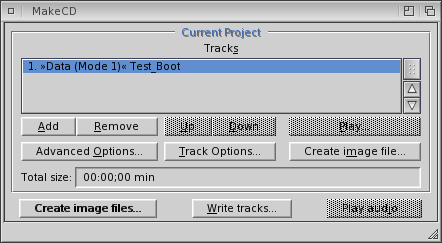
- Press the Add button to add a track using the Track Options window ...
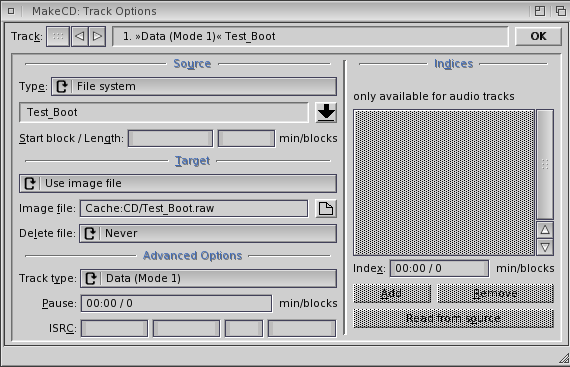
- Set the source Type to "File System"
- Set the Target to "Image File" to create an ISO CD image file -- or -- "Direct to CD writer" if you have a CD burner on your Amiga.
(I can't burn CDs on my system, so these instructions are for the creation of an ISO image file that can be copied to another computer for the final step of burning the CD.)
- Press the down-arrow button to select the source files with the ISO Prefs window ...
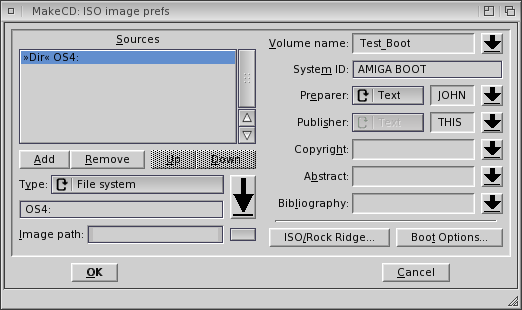
- Add the boot disk directory tree (press the BIG down-arrow button for a file request box)
- Set System ID to "AMIGA BOOT"
- Set Volume Name to any valid CD name (making sure that it matches setting made in Step 0).
- Press the "Boot Options" button to open the Boot Options window ...
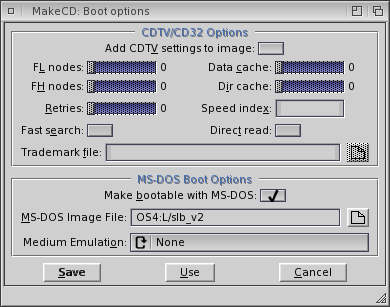
- Check the box for Make bootable with MS-DOS
- Set the MS-DOS Image File to the location of your Second Level Boot file, slb_v2. Note: the SLB file may be taken from any location, it need not reside in L:.
- Set Medium Emulation to "None"
- Additional Notes:
- MakeCD creates .RAW image files, remember to rename imagefile.RAW to imagefile.ISO if you are going to copy the image file to an M$ WinXX computer for burning.
- Test using a CD-RW, then burn to CD when you know the image configuration is exactly what you want
- Consider using a CD-RW as an emergency boot disk. Then you can update it whenever it seems appropriate
Written by:
John Clenance (JCC)
Published: 28th May 2005